Basic tutorial: your first experiment on w-iLab.t office testbed
Run your first experiment on w.iLab-t office testbed
!! THIS INFORMATION ONLY APPLIES TO THE w-iLab.t Office testbed. !!!
Up to date documentation on the w-iLab.t Zwijnaarde testbed can be found at http://doc.ilabt.iminds.be/ilabt-documentation/wilabfacility.html
In this basic tutorial you will learn how to run your first sensor experiment on Wilab.t. The sensor code we will use for this experiment is called RadioPerf. This application is able to send commands over the USB channel to the mote (e.g. start sending radio packets of x bytes to destination y). The mote also periodically sends reports back over the USB channel (e.g. how many packets it received, what the RSSI of the received packets was, ...). In this tutorial you will learn how to tell a sensor node to start sending packets and afterwards analyze the the result with one of the Wilab.t tools. Important note: the program and class files used in this tutorial are programmed/generated in a TinyOS environment. If you are not familiar with TinyOS, it is strongly advised to check out the TinyOS tutorials. Note that the class files are explained in tutorial 4.
Send an e-mail to  to request an OpenVPN account for the w.iLab-t testbed. Be sure to also mention your affiliation and/or project for which you want access to the testbed. We recommend downloading the VPN software from the OpenVPN website. Once you installed the software and received the necessary certificates and credentials, you should be able to connect to the w.iLab-t testbed. Make sure you run the OpenVPN software as Administrator/root !
-
Request w-iLab.t account
-
Create your first job
-
Schedule your first job
-
Analyze results
-
Visualize experiment
-
Schedule parametrized experiment
Now that you're able to connect to the w-iLab.t web interface, you can request an account on the w-iLab.t Office testbed by completing the form on the signup page. You can register for the w-iLab.t Zwijnaarde testbed by clicking "Request Account" on the w-iLab.t Zwijnaarde home page.
Once your account has been approved, you can log in to the w.iLab-t Office testbed. (The following describes your first job on the Office testbed. If instead you want to use the w.iLab-t Zwijnaarde testbed, tutorials are available at the w-iLab.t Zwijnaarde info page (10.11.31.5). After registration on the w-iLab.t Zwijnaarde home page, you should first take a look at the Emulab-OMF tutorial and reserve your nodes here. Now go to the job page to create your first job. Click the Create new job button and fill in a name and description. Click next or go to the files tab. In the files tab you must select at least one Program file and one Class File. The Program File contains the firmware that will be programmed on the sensor nodes. Sensor nodes can send messages to the w.iLab-t server which will be logged in the database. The Class Files define which messages, that are sent by the sensor node, will be logged in the database. For our first job, we will use the RadioPerf-CREW image as Program File and the RadioPerf-ReportMsg as Class File. Select them in the list on the left and click the Add>> button. 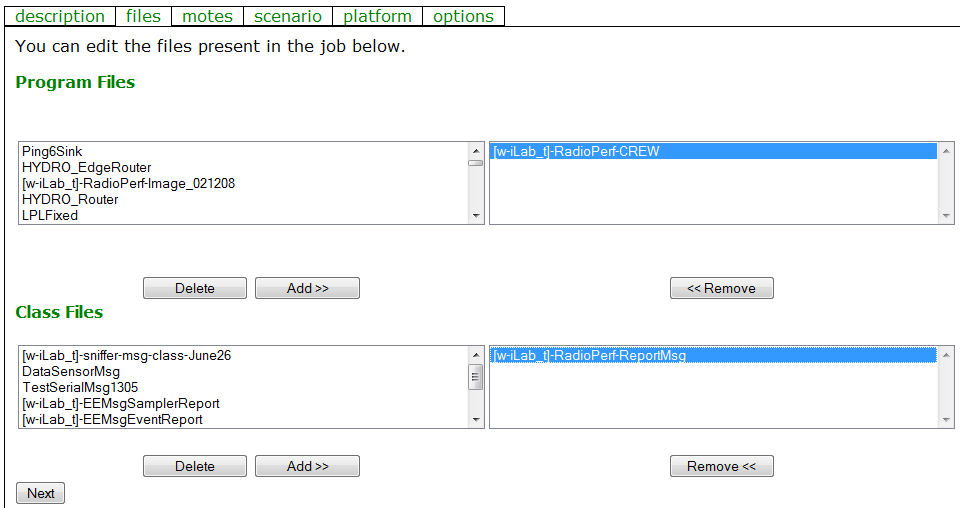 At the bottom of the files tab, it is possible to upload your own images and class files. Click Next or go to the motes tab. You can choose to run the firmware on all available sensor nodes, or pick some specific nodes out of the list. For our first experiment, we can just run the experiment on all available sensor nodes.
  The scenario and platform tabs are not important for our first experiment, so just click the Submit button at the bottom of the page.
Now that we created our first job, we can schedule it to be executed on the testbed. On the schedule page select the job you want to execute and select a zone (part of the testbed) in which you want it to run. (Choose between 1A/1B/2A/2B/3A/3B). Now double click the first time slot where you want the experiment to start and select some consecutive blocks to determine the duration of the experiment. For this first experiment, 10 minutes should suffice. Click Schedule Job to confirm the selection. 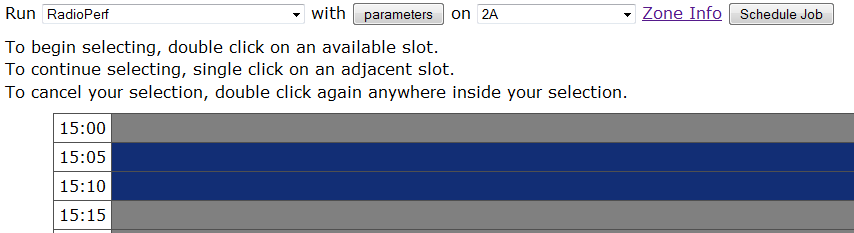
To analyze the results of your experiment (during or after), you can log in to your personal database via the user info page. You should take note of your wilab Database Name which is listing near the top of the page (this is NOT your email-adres). After clicking the phpmyadmin link, you can fill in your username and password. On the left side of the phpmyadmin page you see some general databases and one database which is named after your own user name. Click this database to see what tables it contains. For every job, there should be a table in the database (if it logged any info). Click the browse icon to see all the info your experiment has logged.
The<
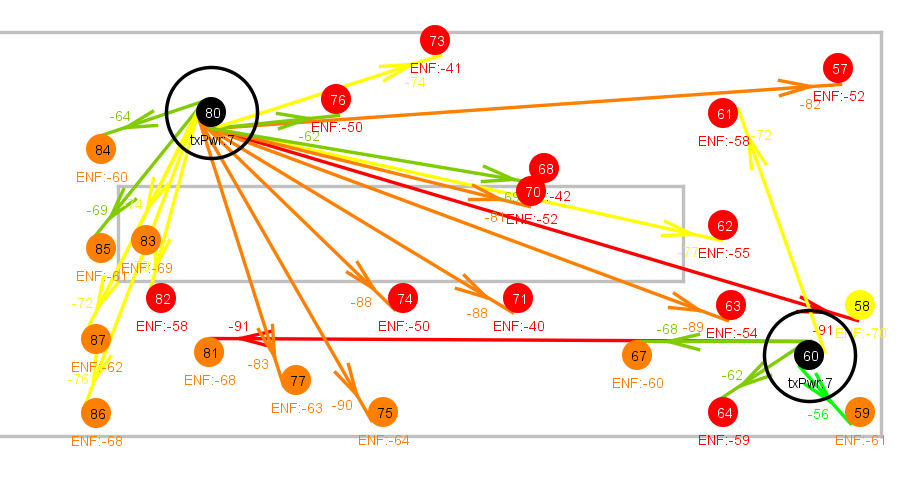
toolbox page contains a list of analyzer and visualizer XML files. Select the [w-iLab_t]_Visual_RadioPerf XML file and click Start Visual to start the Java applet that will visualize your experiment. Now fill in your database user name (not email) and password. You will need to install the sun-java6-plugin to get the applet working. The applet will NOT load with the alternative OpenJDK plugin (IcedTea). The applet has been tested in both Firefox and Internet Explorer. Once the applet has finished loading, you should now see a blue circle with the sensor node id for every active node in your experiment. After some time, every node should log some info to the database and the circles should change color and now also show the estimated noise floor (ENF). In the next step we will show how we can modify the experiment by changing some parameters.
In this step we want to schedule the same job, but change some parameters so that one node will broadcast (single hop) some data packets to all nodes in its neighborhood. Therefore we go back to the
schedule page , select the job we want to run and then click the parameters button. Now look for all parameters starting with RadioPerfP. The default values can be used except for the source parameter. If we want one node to transmit packets to all other nodes (destination value 65535 equals broadcast), we must change this to the id of the transmitting node (e.g. 80 if we run the experiment on zone 2A). 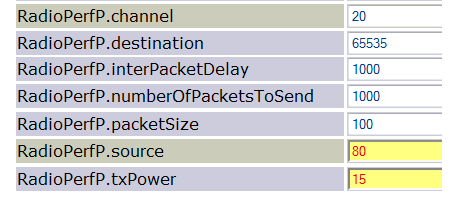 Now choose some time slots, select a zone and click the Schedule Job button. Repeat Step 6 to visualize the parametrized experiment. You should now see arrows from the sending node to all receiving nodes, with an RSSI indication next to the arrows.