TWIST documentation
Browse the sections below for information about the TWIST testbed.
!!! THIS INFORMATION MIGHT BE OUTDATED !!!
Updated documentation can be found at https://www.twist.tu-berlin.de/
Introduction and overview of capabilities
TKN Wireless Indoor Sensor network Testbed (TWIST)
The TKN Wireless Indoor Sensor network Testbed (TWIST), developed by the Telecommunication Networks Group (TKN) at the Technische Universität Berlin, is a scalable and flexible testbed architecture for experimenting with wireless sensor network applications in an indoor setting. The TWIST instance deployed at the TKN group includes 204 sensor nodes and spans three floors of the FT building on the TU Berlin campus, resulting in more than 1500 square meters of instrumented office space. TWIST can be used locally or remotely via a webinterface.
Additonal components
In addition to TWIST, which is a fixed testbed infrastructure, CREW experiments involving mobility can be carried out in the TKN premises using additional equipment. The use of this equipment requires additional support at the TKN premises. This can be achieved either by experimenters beeing present at the premisises or by additional support from TWIST staff.
The additional components are:
- 2 mobile robots: Turtlebot-II based on Kobuki mobile base and a Microsoft Kinect 3D sensor. The robot runs ROS (an open-source, meta-operating system) and it can be programmed to follow certain trajectories in the TWIST building. Shimmer2 sensor nodes or WiSpy devices (see below) can be mounted on the robot, e.g. to record RF environmental maps, or perform experiments emulating body area networks (BANs) as well as experiments involving interaction between a mobile network and the fixed TWIST infrastructure.
- 8 Shimmer2 nodes, which are wearable sensor nodes similar to the popular TelsoB platform and can be attached to a person (or robot).
- 10 WiSpy 2.4x USB Spectrum Analyzers, which are low-cost devices to scan RF noise in the 2.4 GHz ISM band.
-
3 ALIX2D2 embedded PCs equipped with Broadcom WL5011S 802.11b/g cards.
Getting started: tutorials
Below you find information on how to get started using the TWIST testbed. Most steps involve remote access via the TWIST web interface, but there is also a more advanced tutorial on how to control TWIST via the cURL command line tool.
Requesting a user account
To access the TKN instance of the TWIST web interface you need to have registered an account. If you are not yet registered, go to the TWIST web interface where you should see the following welcome page:
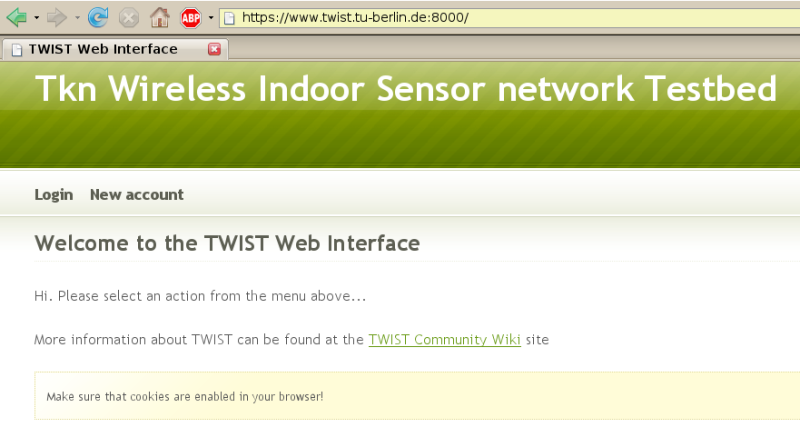 Make sure that your browser has cookies enabled and click on "New account". In the form fill in your name, email address and choose a username (at least 6 characters) and a password. Make sure you confirm the password and answer the spam control question. Then press the "Request" button; if you filled in the form correctly you will see a new page saying "Successful account request". Now go to the TWIST terms of use page. Copy and paste the content of this page into an email, add the requested information (the nature of the intended experiments, etc.) and send this email to the TWIST administrator (email address is given on the same webpage). Please also make sure that you explain your relationship to the CREW project. The last step in obtaining an account is in the responsibility of the administrator, and you will be notified by email when your account has been activated. If there are any problems, please contact Mikolaj Chwalisz.
| Attachment | Size |
|---|---|
| TWIST_login_screen.png | 96.54 KB |
Running a simple experiment
Installing a node image
In this section we install the TinyOS 2 Oscilloscope application on a set of Tmote Sky nodes in the TKN TWIST testbed. The Oscilloscope application is described in the TinyOS 2 tutorial 5. After you have compiled the application with make telosb open a web browser and access the TWIST web interface. Press the "Login" button, enter your username and password and then click on "Sign in". If you have not yet registered a TWIST user account take a look at this tutorial page.
You will see a welcome page where you have three options: manage and update your account settings ("My Info"), schedule and control jobs in the testbed ("Jobs") or logout ("Logout"). Click on "Jobs" and you will see a list of scheduled jobs, i.e. the currently active jobs as well as pending future jobs. Take a close look at the list and find a time period for which Tmote/TelosB nodes are not reserved by someone else. Then click on "Add" and you will see the Job Management page as follows:
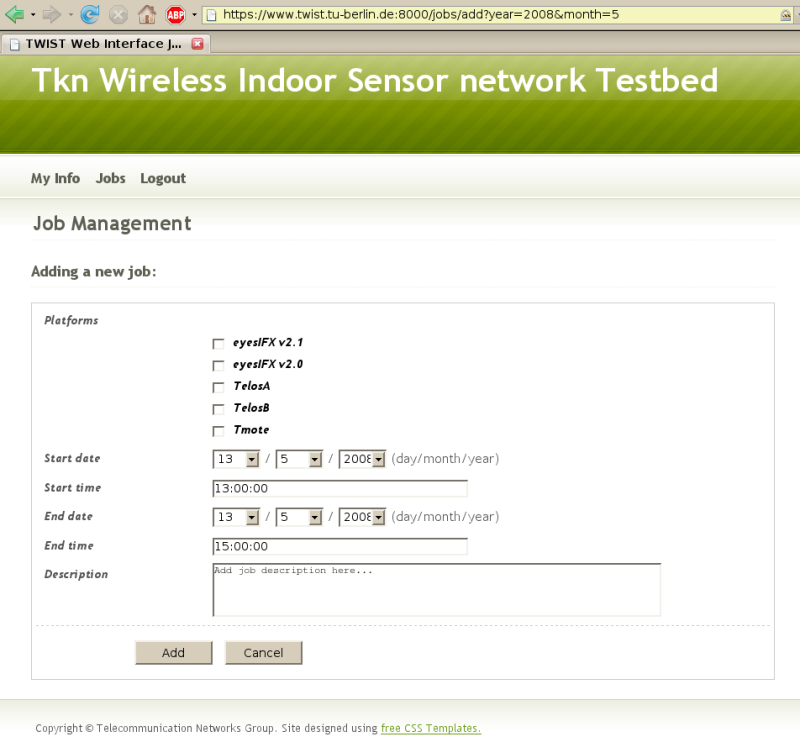
Under "Platforms" select Tmote; then choose a "Start/End date" and "Start/End time" such that the time interval is not overlapping with other jobs, which you checked in the previous step. You cannot make a real mistake here, because the system will automatically check for and not permit jobs that are overlapping in time if they use the same mote platform. However, different platforms (eyesIFX vs. Tmote) may be used concurrently. In the field "Description" enter a short note on what you plan to do in your job, such as "Testing the T2 Oscilloscope application", then click on "Add". If the time interval that you entered was accepted you will be taken back to the list of scheduled jobs, otherwise you get an error message and need to adapt the values.
The list of "Scheduled jobs" should now include your job. Your entry is likely to have gray background colour, meaning that it is registered but not yet active. The current system time is always shown in the upper right corner of the page and once your job becomes active -- its start time is shown in the column "Start" -- the background colour of your entry will turn yellow (you need to click the reload button of your browser).
When your job is active apply a tick mark at the left side of the entry and press the "Control" button at the bottom (the "Edit" button would be used to change the time of your job and with the "Delete" button you can remove your job).
Hint: When your job is active (during a experiment) you can still extend its "End time" by clicking on "Edit" on the "Jobs" page, provided that the new "End time" does not overlap with other registered jobs.
After you have clicked the "Control" button you will see the page for controlling your active job as shown in this figure:
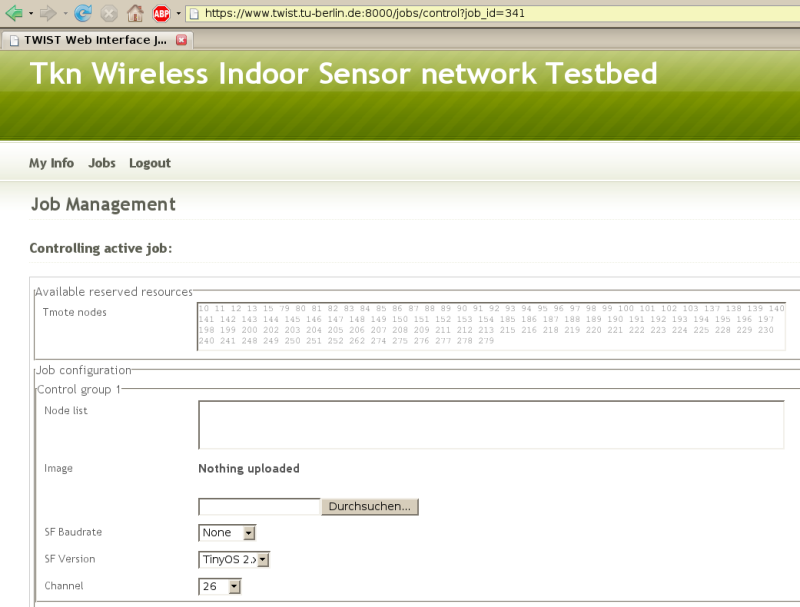
This page is divided into the list of Tmote node IDs available in the testbed ("Available reserved resources"), a section for submitting up to three different program images to be programmed on a subset of the nodes ("Job configuration") and a set of buttons (on the bottom, not shown in Figure 3) to perform some actions, such as installing the image(s) on the nodes.
For the TinyOS 2 Oscilloscope application we want to install the Oscilloscope program image on some Tmote nodes, and one node will need to act as gateway and will be programmed with the TinyOS 2 BaseStation application (see TinyOS 2 tutorial 5). Because we will install two different application images, in the "Job configuration" field we will use two of the three "Control group" sections: the "Control group 1" section for the Oscilloscope application and the "Control group 2" section for the BaseStation application.
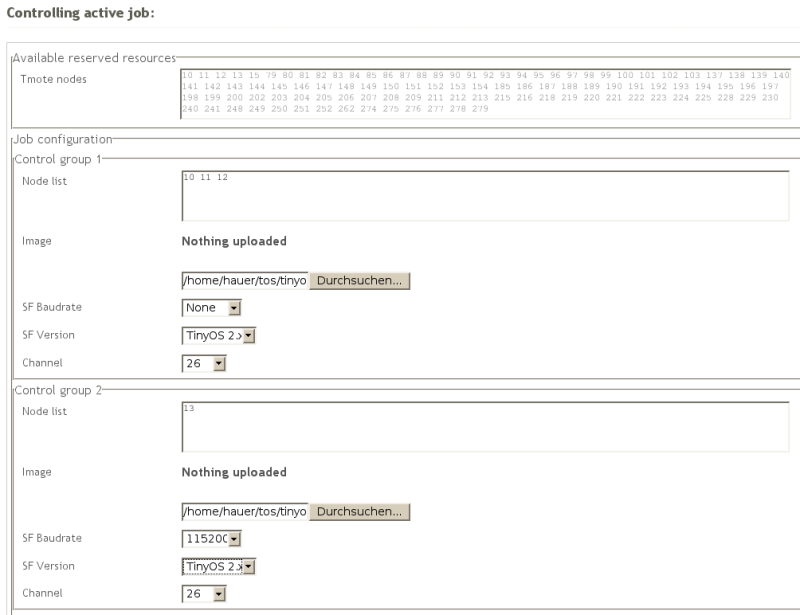
In the "Control group 1" section, enter in the "Node list" field a whitespace-separated list of the node IDs on which the the Oscilloscope is to be programmed, let's say 10 11 12. For convenience you can copy & paste from the list of IDs shown on top in the "Available reserved resources" list.
Then click on the "browse..." button next to the "Image" field just below the "Node list" field. Select the Oscilloscope image, which is the main.exe in your local tinyos-2.x/apps/Oscilloscope/build/telosb (you must have compiled the Oscillocope application with "make telosb" before). The "SF Baudrate" and "SF Version" fields control whether a SerialForwarder will be started for all nodes in the respective "Node list". Since we only need a SerialForwarder for the BaseStation application, we don't change the values (leaving it "None", "TinyOS 2.x"). Finally, "Channel" is the IEEE 802.15.4 channel to be used by the Tmote Sky radio CC2420 (if you change the channel for the Oscilloscope application, make sure that you do the same for the BaseStation application). In fact, the value of the CC2420_DEF_CHANNEL symbol inside your progam image will be replaced by the value of the "channel" field and thus, if your application includes the TinyOS 2 CC2420 radio stack, you can still modify the default radio channel after you have compiled the image.
Hint: The node ID is another symbol that is modified for each node individually before programming the image. It is accessible via TOS_NODE_ID in a TinyOS application.
We use the "Control group 2" section for installing the BaseStation program image on another node. In the "Node list" field enter 13 (or whichever node ID you want to use for the BaseStation application) and under "Image" click "browse..." and select the main.exe from your local tinyos-2.x/apps/BaseStation/build/telosb folder (you must have compiled the BaseStation application with "make telosb" before). Because we want to later establish a serial connection to the BaseStation node, select the pull-down menu under the "SF Baudrate" field and choose a serial baudrate. Whenever this field has a value other than None a SerialForwarder will be started for all nodes in the respective "Node list". The default baud rate for the "TelosA", ",TelosB" and "Tmote" platforms is 115200 baud.
Hint: You can change the baud rate for a telos node by modifying tinyos-2.x/tos/platforms/telosa/TelosSerialP.nc (this file is included by telosa, telosb and tmote platform). Make sure you recompile your application after changing the file.
The "SF Version" field defines the version of the Serial Forwarder protocol. Because we are using a TinyOS 2 applications select "2" (for a TinyOS 1 application you would select "1"). If the "SF Baudrate" field is None then the "SF Version" is ignored. Finally, make sure you select the same "Channel" as the one for the Oscilloscope application. Your configuration should now look like the one shown the next figure:
To actually program the images on the nodes scroll down, press the "Install" button and wait. After not much longer than 1 minute you should see a page with the "Execution log". Check for possible errors (any line "Could not find symbol [...] ignoring symbol" is only telling you that the respective symbol was not found/changed in the application image) and scroll down to the bottom where you can find a summary of the "Install" operation. Here you can also see that a SerialForwarder has been started for node 13:
To forward SF e.g. for node 13 use: ssh -nNxTL 9013:localhost:9013 twistextern@www.twist.tu-berlin.de
In the next section we will establish an ssh tunnel to the TWIST server and connect to the SerialForwarder of the BaseStation node. The remainder of this section summarizes the fields and options for controlling an active job over the web interface.
The following table describes the fields in the "Job configuration" section:
Field Meaning Node list Whitespace separated list of node IDs on which the image will be programmed Image The image to be programmed on the nodes in the "Node list" SF Baudrate Whether a SerialForwarder is started for each of the nodes in "Node list"
and what baudrate it will useSF version The version of the SerialForwarder: use 1 for TinyOS 1.x and 2 for TinyOS 2.x Channel The CC2420 radio channel
The following table describes the buttons on the bottom of the "Controlling active job" page:
Button Meaning Install Installs the image(s) on the node(s) specified in the above "Job Configuration"
section; SerialForwarders will be started (if selected) and nodes are powered onErase Programs the TinyOS Null application on the selected set of nodes Reset Resets (powers off & on) the selected set of nodes Power On Cuts the USB power supply for the selected nodes Power Off Enables the USB power supply for the selected nodes Start SF Starts a SerialForwarder for the selected nodes Stop SF Stops the SerialForwarder for the selected nodes Start Tracing Stores the serial data output from the nodes in a trace file Stop Tracing Stops storing data in a trace file
By pressing the "Start Tracing" button the serial data output from all nodes are automatically stored to a trace file. This file can be accessed via the job control page by pressing the "Traces" button (with your job checked). If you want to use automatic tracing then it is recommended that during install you select the correct "SF Baudrate" and "SF Version". After the install process, you can then simply click on "Start Tracing" without having to manually start the serial forwards.
Exchanging Data via the Serial Connection
Through the previously described "Install" operation a SerialForwarder for the BaseStation node was started. In order for your tinyos-2.x/apps/Oscilloscope/java/Oscilloscope.java client to connect to this SerialForwarder, you first need to establish an SSH Tunnel to forward the port of the SerialForwarder to your machine. At the very end of the execution log you find the syntax for this SSH command (type it into a shell):
ssh -nNxTL 9013:localhost:9013 twistextern@www.twist.tu-berlin.de
Once you have forwarded the port you can access the remote SerialForwarder like a local one. However, when you start your client application make sure that it attaches to the correct port as specified in the SSH Tunnel (the above command forwards the remote port to your local port 9013). For example, to start the JAVA Oscilloscope client you would first need to set the MOTECOM environment variable as follows:
export MOTECOM=sf@localhost:9013
Now you can start the Oscilloscope GUI by typing:
.\run
in the tinyos-2.x/apps/Oscilloscope/java directory as described in TinyOS 2 tutorial 5.
You should now see an Oscilloscope GUI like the one described in the TinyOS tutorial.
| Attachment | Size |
|---|---|
| TWIST_job_management.png | 104.83 KB |
| TWIST_active_job_control.png | 89.52 KB |
| TWIST_example_job_control.png | 61.46 KB |
Using cURL for automated control
cURL is a command line tool that can, among other things, transfer files and POST web forms via HTTPS. It can thus be used to automate sequences of operations on the testbed, such as installing an image or powering a node off. Before you can actually control your job you need to authenticate via cURL (Step 1) and find you job ID (Step 2). Afterwards you can control your job (Step 3) and download traces (Step 4) associated with your job ID. The following steps list the relevant cURL commands.
Step 1: Authenticate
Use the following format to authenticate and store the secure cookie for the future requests (replace YOUR_USER_NAME and YOUR_PASSWORD with your username and password, respectively):
curl -L -k --cookie /tmp/cookies.txt --cookie-jar /tmp/cookies.txt -d 'username=YOUR_USER_NAME' -d 'password=YOUR_PASSWORD' -d 'commit=Sign in' https://www.twist.tu-berlin.de:8000/__login__
Note that all data fields have to be URL encoded either implicitly using --data-urlencode or explicitly (in case you have special characters in username/password)
Step 2: Find the job_id
You need to know the job_id before you can use curl to control it. This can also be done by fetching and parsing the jobs page with cURL, maybe passing the output through "tidy"
curl -L -k --cookie /tmp/cookies.txt --cookie-jar /tmp/cookies.txt https://www.twist.tu-berlin.de:8000/jobs | tidy
Step 3: Control
The following is a list of examples on how to control a job. Make sure that you replace the job_id and node IDs.
-
Erase - For job_id 346, erase nodes 12 and 13:
curl -k --cookie /tmp/cookies.txt --cookie-jar /tmp/cookies.txt -F __nevow_form__=controlJob -F job_id=346 -F ctrl.grp1.nodes="12 13" -F erase=Erase https://www.twist.tu-berlin.de:8000/jobs/control
-
Install - For job_id 346, install TestSerialBandwidth on nodes 12 and 13 and start serial forwarders:
curl -k --cookie /tmp/cookies.txt --cookie-jar /tmp/cookies.txt -F __nevow_form__=controlJob -F job_id=346 -F ctrl.grp1.nodes="12 13" -F ctrl.grp1.image=@/home/hanjo/tos/tinyos-2.x/apps/tests/TestSerialBandwidth/build/telosb/main.exe -F ctrl.grp1.sfversion=2 -F ctrl.grp1.sfspeed=115200 -F install=Install https://www.twist.tu-berlin.de:8000/jobs/control
-
Power Off - For job_id 346, power off nodes 12 and 13:
curl -k --cookie /tmp/cookies.txt --cookie-jar /tmp/cookies.txt -F __nevow_form__=controlJob -F job_id=346 -F ctrl.grp1.nodes="12 13" -F 'power_off=Power Off' https://www.twist.tu-berlin.de:8000/jobs/control
-
Power On - For job_id 346, power on nodes 12 and 13:
curl -k --cookie /tmp/cookies.txt --cookie-jar /tmp/cookies.txt -F __nevow_form__=controlJob -F job_id=346 -F ctrl.grp1.nodes="12 13" -F 'power_on=Power On' https://www.twist.tu-berlin.de:8000/jobs/control
-
Start Tracing - For job_id 346, start tracing on nodes 12 and 13:
curl -k --cookie /tmp/cookies.txt --cookie-jar /tmp/cookies.txt -F __nevow_form__=controlJob -F job_id=346 -F ctrl.grp1.nodes="12 13" -F 'start_tracing=Start Tracing' https://www.twist.tu-berlin.de:8000/jobs/control
-
Stop Tracing - For job_id 346, stop tracing on nodes 12 and 13:
curl -k --cookie /tmp/cookies.txt --cookie-jar /tmp/cookies.txt -F __nevow_form__=controlJob -F job_id=346 -F ctrl.grp1.nodes="12 13" -F 'stop_tracing=Stop Tracing' https://www.twist.tu-berlin.de:8000/jobs/control
Step 4: Collect data
To collect the specific trace file from archived job 336
curl -g -k --cookie /tmp/cookies.txt --cookie-jar /tmp/cookies.txt -d 'job_id=339' -d 'trace_name=trace_20080507_114824.0.txt.gz' -o trace_20080507_114824.0.txt.gz https://www.twist.tu-berlin.de:8000/jobs/archive/traces/download
Hardware and testbed lay-out
The TKN Wireless Indoor Sensor network Testbed (TWIST), developed by the Telecommunication Networks Group (TKN) at the Technische Universität Berlin, is a scalable and flexible testbed architecture for experimenting with wireless sensor network applications in an indoor setting. It provides basic services like node configuration, network-wide programming, out-of-band extraction of debug data and gathering of application data, as well as several novel features:
- experiments with heterogeneous node platforms
- support for flat and hierarchical setups
- active power supply control of the nodes
The self-configuration capability, the use of hardware with standardized interfaces and open-source software makes the TWIST architecture scalable, affordable, and easily replicable. The TWIST architecture was published in this paper.
The TWIST instance deployed at the TKN group is one of the largest academic testbeds for indoor deployment scenarios. It spans the three floors of the FT building at the TU Berlin campus, resulting in more than 1500 square meters of instrumented office space. Currently the setup is populated with two sensor node platforms:
- 102 TmoteSky nodes, which are specified in detail here.
- 102 eyesIFXv2 nodes; this platform is an outcome of the EU IST EYES project. The platform is based on an MSP430 MCU and the TDA5250 transceiver, which operates in the 868 MHz ISM band using ASK/FSK modulation with data-rates up to 64 Kbps. A summary of the platform's hardware components is given, for example, in this paper.
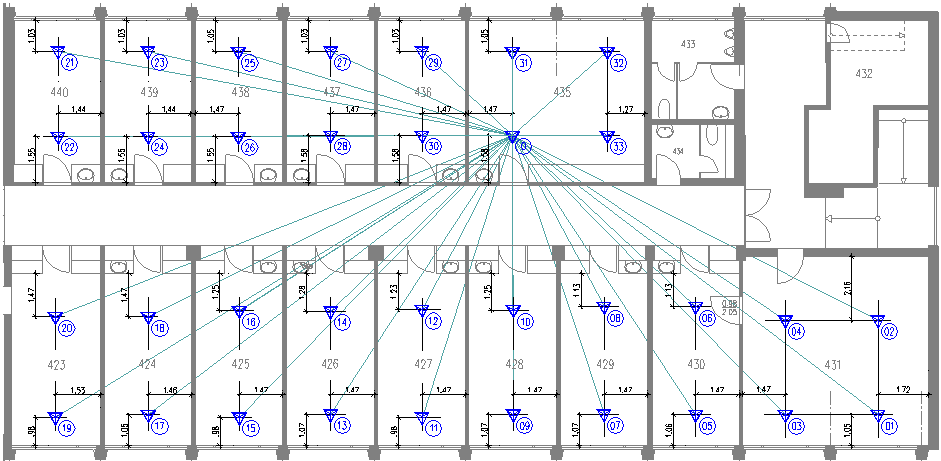
In the small rooms, two nodes of each platform are deployed, while the larger ones have four nodes. The setup results in a fairly regular grid deployment pattern with intra node distance of 3m. The following shows the node placement on the 4th floor of the building (floors 3 and 2 have a very similar layout):
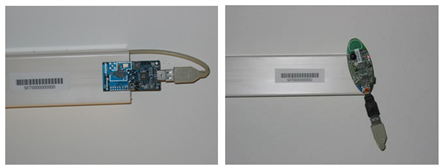
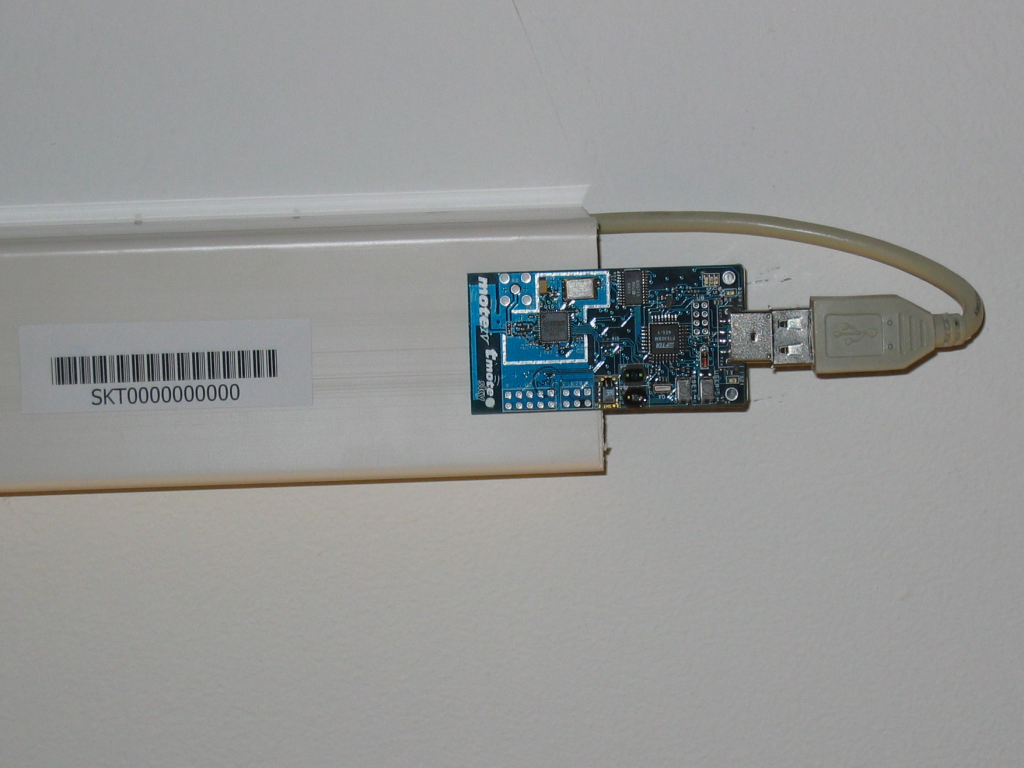
The testbed architecture can be divided into three tiers. The sensor nodes form the lowest tier, they are attached to the ceiling as visualized in the following figure, which shows a Tmote Sky and an eyesIFXv2 node in one of the office rooms:
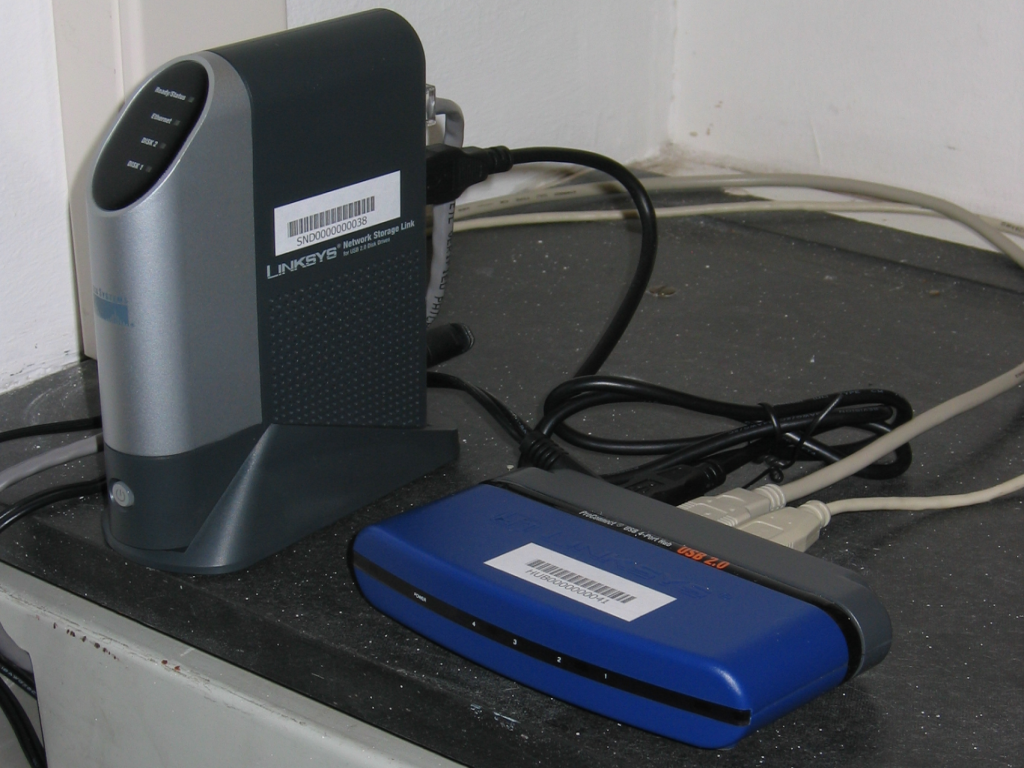
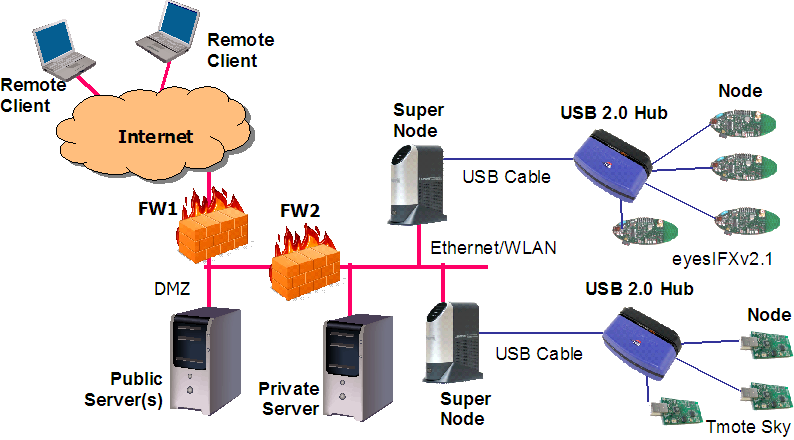
Sensor nodes are connected via USB cabling and USB hubs to the testbed infrastructure. If TWIST only relied on the USB infrastructure, it would have been limited to 127 USB devices (both hubs and sensor nodes) with a maximum distance of 30 m between the control station and the sensor nodes (achieved by daisy-chaining of up to 5 USB hubs). Therefore the TWIST architecture includes a second tier: so-called "super nodes" which are able to interface with the previously described USB infrastructure. We are using the Linksys Network Storage Link for USB2.0 (NSLU2) device as super nodes as depicted in the following picture:
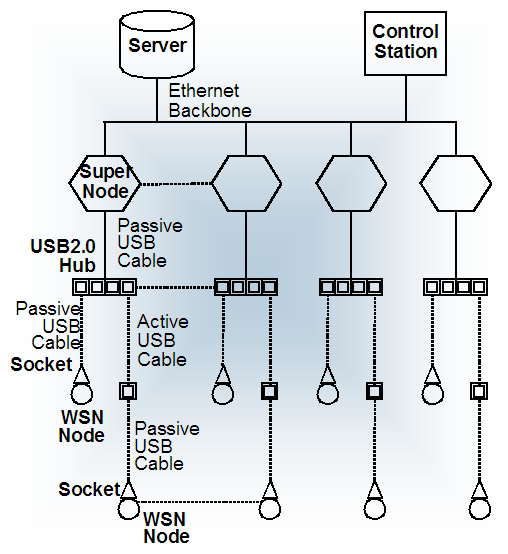
The third and last tier of the architecture is the server and the control stations which interact with the super nodes using the testbed backbone. The server, among other things, implements a PostgreSQL database that stores a number of tables including configuration data like the registered nodes. It also provides remote access via a webinterface. The following figure provides a general overview of the TWIST hardware architecture:
The hardware instantiation of the TWIST hardware architecture at the TKN group is shown in this figure:
| Attachment | Size |
|---|---|
| TWIST_components.png | 115.05 KB |
| TWIST_architecture.png | 70.2 KB |
| TWIST_slug.png | 1.04 MB |
| TWIST_telos.png | 1.01 MB |
| TWIST_floorplan.png | 25.42 KB |
| TWIST_tmote_and_eyesIFXv2.png | 66.14 KB |
System health monitoring
The system health of the TKN TWIST instance is constantly monitored using the CACTI monitoring tools:
You can either use the CACTI System Health Summary, which displays information on the utilization of the testbed server and super node status. The information is updated every 30 min.
Or you can access the CACTI System Health Browser to see more fine-grained information on some particular systems components (please use account name "guest" and password "guest" to get access to the public data.)